Wednesday, October 30, 2013

Halloween Potions Bottles


Every witch needs a kitchen full of her very own creepy tinctures.
{Oh, yes.  I used that old word.}

Ridiculously easy and quick to put together - you'll have an instant witchy kitchen in mere moments.
Here's how:

1.  Gather old bottles and jars.  I have a spice rack with special jars that I needed to reload so I was able to empty these glass spice jars.  Spice jars are great because they take up very little space in storage, but really easy to reload from year to year with your creepy contents.
2.  Soak the jars in hot, soapy water to remove labels.
3.  Some labels are a little stubborn.  Pour Goo Gone onto a terry cloth hand towel and gently rub away the label. 
4.  Print off your labels on full sheet label paper.  I have seen them ALL over the internet {Pinterest is bursting with them}.  However, I found these on Etsy and fell in love with them. 
5.  Cut out your labels.  I prefer to use full sheet label paper instead of the suggest Avery sheets that may be defined by the label creator.  I would rather take the time to cut out the label than print and find out my printer isn't aligned perfectly.  
6. Carefully apply the label to the jar and fill with fun items!
I used an array of party favors from Party City, left over Halloween decorations, food coloring and natural elements from the outside.
I loved this project and I love the way all the creepy jars look in my kitchen.
Now I have my spellbook... I have my tinctures... it's time to brew up some tricks and treats!

Happy Halloween!!!

Sunday, October 27, 2013

Evans Pumpkin Carving 2013


Halloween officially fell upon our house with our annual pumpkin carving.  This year, I wanted something dark and ominous.  I found this pattern on Zombie Pumpkins and instantly fell in love.  Unfortunately, I picked out a SUPER young pumpkin, that had loads of seeds (yum!), but was very, very veiny.  It took me FOREVER to clean out the inside.  My husband, on the other hand, had his cleaned out in mere minutes and was able to carve a really cool haunted house.  I'm really happy with the way both pumpkins turned out this year.

... oh, I forgot to mention that I woke up the next morning and carved another pumpkin!  We were heading to a Jimmy Buffett concert... so, of course, we needed a parrot!
For tips and tricks about how to carve pumpkins - check out my tutorials here.
For patterns and inspiration, check out my Pumpkin Carving Pinterest Board.

Happy Halloween!!!

Wednesday, October 16, 2013

Halloween Spellbook


Every witch is in need of a spellbook - and this witch is no different!  Ever since I first laid eyes on Winifred Sanderson's spellbook, I've been begging for one of my own {without having to sell my soul to the devil}.  I've seen a lot of tutorials on how to make a creepy spellbook across the internet, but how about giving a little function to these tomes?

Get this - it doubles as a scrapbook!  Truth be told, I'm not a very dedicated, consistent or talented scrapbooker, but I do like preserving my memories with the least amount of effort possible.  {Laaaazy crafter!}

I introduce to you the Evans Spellbook.  It's creepy - it's spooky - it's awesome!  Here's how I did it:

I purchased an old dictionary off of Etsy.  I actually scoured eBay and similar sites to find the best price and a book that fit what I was looking for.  I wanted an older dictionary because of the embossed cover and they typically don't have the alphabetical tabs along the outside.  This dictionary is from the 1940s and about 8" x 10", 3" thick.  Perfect for my lasting spellbook!
I purchased these wood pieces at Michaels with the intent of decorating the cover.
Of course, I wanted everything to black, but I didn't want it to be perfect or shiny.
I used basic acrylic craft paint to turn everything black.  You can use different types of paint to change the look of your book.
Hot glue does the trick to adhere the wood to the cover.
A two inch wide orange ribbon makes the perfect bookmark.  Stand the book up, opening slightly to bend the spin, and use hot glue to adhere ribbon.
A little snipping with scissors and sealing with a ligher completes the creepy look.
My intent was to keep this as a scrapbook of our Halloween's from year to year that could eventually be passed to our future kids.  I also wanted to have a place to hold all the really cute and cool Halloween images I find online that I can't find a place for in my other decorations.  It turned out beautifully.  Take a look inside.  {Please don't judge my awful scrapbooking.}
I created a cover in Microsoft Powerpoint and printed with a parchment background.
I created a few prompts so we can capture fun tidbits of Halloween memories from year to year.  You can find the printable below.
You will find prompts for what Halloween costumes were worn that year, what were your favorite costumes you saw, and what you carved.
Etsy is full of awesome printables that I've been dying to buy and use.  The Chocolate Rabbit is one of my favorite shops - they produce amazing stuff.  Check out their shop here.
A dictionary is the perfect book to use because you get all these great words that work with Halloween.  I googled "Halloween Words" and found lists upon lists.  I spent about an hour going through the book decorating pages and highlighting words.  It was surprisingly fun!  Plus, it's always good to brush up on your dictionary skills.
And of course, there's always the super cute signs I find on Pinterest that... if I framed them all, would FILL my house every Halloween.  This is a good way to wrangle them.

Additionally, the spellbook is home to some retired paper Halloween decorations.  Things I wanted to keep from my childhood but no longer belong in the decorations boxes.  I'm so happy they have a home now.
We absolutely love this spellbook and will look forward to pulling it out every year.  I hope you will make one and love it too.


Saturday, October 12, 2013

Printable Halloween Banners


It's that time of year... when everyone's houses get just a little spooooky.  I love it!  This year I went for a more creepy carnivalesque style, starting with these Halloween Banners.  As easy as "Trick or Treat", you can have these printed and hanging in a minutes!

There are three banners for your enjoyment:
Spooky
Happy Haunting
Happy Halloween
You can find the links to print them at the end of this post.

In the meantime, want some guidance on how to put together these awesome banners?  Here's how!


Materials
8.5" x 11" White Cardstock Paper {for printing}
8.5" x 11" Black Cardstock Paper {for banner}
Black Ribbon {used: 1/2" wide}
Glue 
Paper Cutter
Scissors
X-Acto Knife and Cutting Mat
Lighter {for sealing the ends of your ribbon}


1.  Print off the banner.  You can find the links at the end of this post.

2.  Using a paper cutter, cut out the banners along the long edges.


3.  Using scissors, carefully cut out the inside of the tails along the lines.


4.  Using a paper cutter, cut black cardstock in half so you have two 5.5" x 8.5" pieces of paper.


5.  Using glue, attach your white cardstock pieces to your black cardstock pieces leaving about 1/4" around the two sides and the top.


On one banner I used a glue stick and on the other two I used Elmers School Glue.  The School Glue takes a much longer time to dry than the glue stick but it also gives the paper really cool curves.  The curves give the effect of motion in the banner and definitely add to the creepy factor.  However, use whatever adhesive you would like.  Double-sided tape would also work well for this project.


6.  To trim out the black between the tails, you can either use scissors or an X-Acto knife and ruler to cut leaving a black border of about 1/4".  I found the latter to be easier, but use whatever you have on hand and are comfortable with.


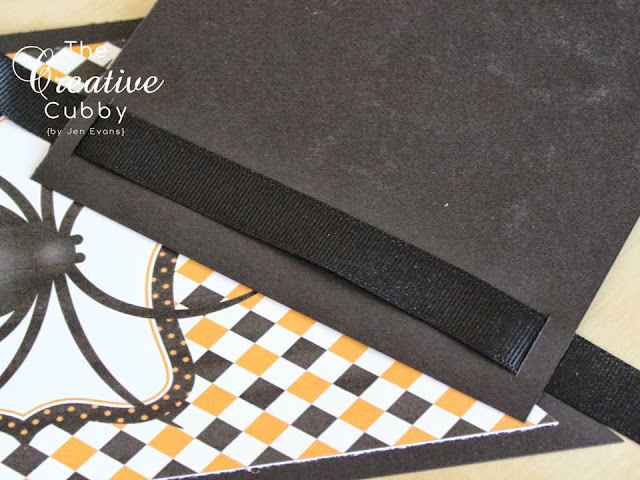
7.  Using an X-Acto knife, cut a 1" slit into the black cardstock along the edge of the white cardstock.  Be sure it goes all the way through the black.


Ta-Da!  You're ready for your final step!


8.  Put your banner pieces in order and begin stringing onto your ribbon.  To put on ribbon, string ribbon through the left slit on the front of the banner.  Flip piece over and feed through the right slit to the front.


I prefer to melt/seal the ends of my ribbon when working with them this way.  To do, very, very carefully hold the lighter about 1/4" away from the end of the ribbon and gently bring close to the frayed/cut ribbon end.  You will see it melt onto itself.  You only need to graze the side of it - DO NOT BURN IT.  This will seal the side so it feels plastic-y.


Hang and enjoy!  Look at how creepy and spooky these turned out!!!


Happy Halloween!

 
Blogging tips