Showing posts with label Gifts. Show all posts

Tuesday, December 15, 2015

Wrapping Presents with Ornaments


Every year, I tend to get a little too fancy with the wrapping. We're talking thick paper, ribbons, and always some type of embellishment. This year, everyone is getting gifts with ornaments on top. I mean, really, it's super pretty and what's life without a little whimsy? 

As a bonus, adding ornaments to gifts is an inexpensive and incredibly easy way to dress up the packaging.


I got my ornaments and ribbon at Big Lots - on sale. I love the glitter snowflakes! I've used them in wrapping and decorating for years. The miniatures bulbs were the perfect touch to the top of the gift.


So how do you do it? Simply string the ornaments on twine or ribbon and attached to your package. No fancy techniques. Not tricks. String and tie... and it looks like you spent a bundle on fancy wrapping. Everyone gets free ornaments too!


I also like buying ornaments for people as gifts. This is the perfect opportunity to showcase them! Who says you have to put all gifts inside a box?

Like the gift tags? Get the free printables here!

Happy Wrapping!

Thursday, November 12, 2015

Crafty Baby Monthly Onesies


I adore the monthly baby photography trend that's reached mainstream in the past few years. Not only is it a great way to track your baby's growth and changing looks throughout their first year, it's an especially fun way to get crafty. Some opt for onesie stickers, while others set a full scene full of their baby's favorite things. Both are fun! However, I prefer to get a little crafty. Below are the onesies I've made for a friend's daughter over the past year. Conveniently enough, she was born in December, so Month 1 corresponded with the first month of year. We chose to do icons that represented what made each month special. The outcome was adorable!

Below each picture I've listed the specific materials and techniques used to create each onesie.


Month 1 - January
Cricut cut out snowflake
Blue Iron-on Vinyl
Silver Glitter Glue
Rhinestones adhered with Tacky Glue


Month 2 - February
Cricut cut out blue bird and 2
Blue and PinkIron-on Vinyl
Black and Pink Slick Fabric Paint


Month 3 - March
Cricut cut out circle and 3
Blue and White Iron-on Vinyl
Red, Black and Red Slick Fabric Paint
Rhinestones adhered with Tacky Glue


Month 4 - April
Cricut cut out template for bunny, traced onto onesie
Pink Puffy Fabric Paint
Dark Pink, Black, Silver and Purple Slick Fabric Paint


Month 5 - May
Cricut cut out stencil for cactus
Green, Gold, Red and Silver Slick Fabric Paint
* I used the negative of the cut out as a stencil and used round sponge brush to paint onto the fabric.


Month 6 - June
Cricut cut out stencil for pirate octopus
Purple, Pink, Black Slick Fabric Paint
White and Teal Puffy Fabric Paint
* I used the negative of the cut out as a stencil and used round sponge brush to paint onto the fabric.


Month 7 - July
Black Puffy Fabric Paint
Red, Blue and Silver Glitter Glue


Month 8 - August
Cricut cut out for ice cream, template for cone
Pink Iron-on Vinyl
Brown Slick Fabric Paint
Pink, Purple, and Yellow Puffy Fabric Paint
* I used the negative of the cut out cone as a stencil and used round sponge brush to paint onto the fabric.


Month 9 - September
Cricut cut out football
Blue Iron-on Vinyl
Iron-on Varsity Number 9
Yellow Puffy Fabric Paint


Month 10 - October
Black and Orange Slick Fabric Paint
* This onesie was paired with a very vibrant hair bow.


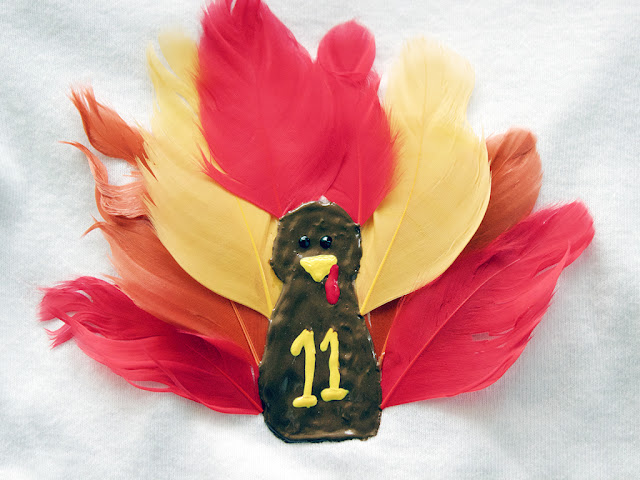
 Month 11 - November
Brown, Yellow, Black, and Red Slick Fabric Paint
Craft Feathers
Clear Fabric Glue
* Paint on turkey body first. Let dry. Lay out the feathers in the shape you'd like and cut down to size. Glue to fabric. Touch up brown fabric paint to fill in any unintended gaps between body and feathers.


I can't believe this year is already over!

What creative ideas do you have for baby onesies?


Saturday, October 31, 2015

{In the Shop} :: The Simpsons Chalkboard Quotes


My love of The Simpsons is inspiring me again! One of the best parts of every episode is the chalkboard gag during the opening scene. Whether they are simply comical or tongue-in-cheek political commentary, I never regret paying special attention to catch what Bart is writing on the chalkboard. 


 I've created eight unique cross stitch designs inspired by my favorite chalkboard quotes. All patterns are designed for beginners and finish at a perfect 5" x 5".


Do you have a favorite quote that isn't featured in the shop? I'm always happy to entertain custom orders. Contact me through Etsy and let's talk!


Tuesday, June 16, 2015

Baby Monthly Onesies 4-6

Continuing with the monthly onesies... here's our summertime adorableness.


Month 4 - April
April is all about bunnies and hoppity-hops.  Why wouldn't I put a pretty pink bunny on Month 4?  All puffy paint this time.


Month 5 - May 
When you're in Arizona, Cinco de Mayo is kind of a big deal.  So are cacti and sombreros!  I used my Cricut to create a stencil with cardstock and spongebrushed fabric paint onto the fabric.

Month 6 - June
I couldn't resist this cuteness.  Pirate Octopus!!! 

Bonus - Mother's Day
Of course, I had to make a special onesie for Mother's Day.


Saturday, January 31, 2015

Baby Monthly Onsies 1-3

I've been granted the great honor of designing the monthly onsies for my lovely little niece.  Working with my best friend and her husband, we've put together designs for each month that match either the season, holidays or special memories for them.  Using my Cricut (vinyl iron-on) and fabric paint, I've had a ton of fun decorating these onsies for Baby.  

Month 1 - January
A wintery theme was obvious for month 1.  I used my Cricut to create the snowflake, glitter fabric paint for the 1 and added rhinestones for a little girly glitz (applied using Tacky Glue).


Month 2 - February
Oh, the romantic month of February, which also happens to be the month my friends got married.  The bird and 2 are Cricut designs that I embellished with fabric paint. 


Month 3 - March
Now, some people may do a St. Patrick's Day theme for March, but for this baseball family, it's all about Spring Training.  I kept the onsie pretty gender neutral (except for the glitzy rhinestones) since Baby has a collection of beautiful baseball-themed bows.  The baseball is made from a simple circle vinyl cut-out with stitches added with fabric paint.  


I'm only making the onsies 3 at a time since we really don't know how quickly she will grow.  I can't wait to share the next set of three in March!


Saturday, February 8, 2014

Introducing :: A Desi Lu Production


When we met almost 8 years ago, I never would have imagined that my friend Desiree and I would be crossing paths as we are now.  While working together at a theatre, we would casually discuss our various creative endeavors, but it wouldn't be until many years later that either of us would allow those skills to manifest into anymore than personal crafts.  However, in recent years, Desiree has turned her truly amazing gift for sewing into an Etsy-based baby boutique called A Desi Lu Production.  Seriously... how cute are these?!
I sat down with Desiree to ask her a few questions about her inspiration and her shop... {Pst... she's also giving away one of these adorable bibs to a Creative Cubby reader.  Enter below!}

1.  Tell us a little about you.
I'm a curly-haired Texas girl who loves singing, reading, going to Broadway shows, and being with family. I met my husband when I was attending Arizona State University and we recently moved back to my home of San Antonio, Texas. I'm a board certified music therapist working with individuals who have developmental disabilities and I'm in the process of starting my own business called Blue Skies Music Therapy. I'm also a part time stay at home mama to our 21-month-old daughter, Lucia Wren. She is by far the best thing I have ever created. 

2.  Your pieces show a lot of skill.  When did you start sewing and how did you learn?
 You could make a pretty convincing argument that it's in my blood. My mom is a retired fashion and costume design teacher and I can't remember a day of my childhood that didn't involve the background noise of the sewing machine. My two sisters and I wore a lot of matching dresses, designed our own prom dresses, had the best dressed dolls on the block, and got to be exactly what we wanted every Halloween. If there were pants that were too long, a top that was too immodest, a dress that just didn't hang right, she could fix it. As I got older, moved away from home, and then had a daughter of my own, I realized how incredibly lucky I was and what a completely necessary skill it was to have a basic understanding of sewing and garment construction. My poor mom had tried to corral us girls and teach us when we were younger, but sewing and crafting were so different in the 90's! In the minds of me and my sisters there was nothing cool about sewing or making crafty things so we resisted her at every turn. I'm so excited that websites like Pinterest and blogs like yours have really changed the face of crafting and DIY projects and inspired so many young people to create no matter what the medium. After we moved back to Texas I told my mom that I wanted to learn EVERYTHING. For my birthday two years ago I had an enormous surprise package on my doorstep; she had bought me a used sewing machine and it's just been an exciting and fulfilling learning experience ever since. She taught herself to sew when she was a teenager and now I am learning from her. It's a legacy that I am proud to continue.
3.  What inspired you to do baby bibs? 
I originally found the business bib pattern through another seller on Etsy who allowed me to become a licensed seller. I had seen similar shirt and tie bibs online and I felt that while they were cute patterns, they were lacking the authenticity of menswear. Which sounds silly because we are talking about babies, but as a new parent I noticed that the clothing that I was drawn to buy for Lucia were the outfits that looked like something I would wear, but in miniature. The simple fact was that most parents wanted to dress their baby up in something that was similar to their own style. So I decided to look at the trends in menswear and use classic patterns like plaids, argyle, gingham, and stripes and pair them in a way that I felt even my own husband would wear while sticking to color palettes that keep a youthful feel. Being the oldest of three girls and having a daughter of my own, the challenge of doing items for little boys interested me, and I had heard from so many of my friends who had little boys that there was a general lack of stylish baby boy merchandise out there. I like to think that I am helping to close that gap a little bit. 

4.  Are there other products that you make?  
 Currently in the shop I also have baby bow ties and bunting. Right now I am planning on expanding the bow tie selections and planning some bibs for spring.  I get asked all the time about little girl items, and I may expand into that in the future, but I don't want to offer new items unless I can ensure a high level of design and craftsmanship after testing and experimenting. 
5.  What is your favorite part about making your products? 
The designing and shopping! I do most of my searching online or at independent fabric stores to find truly unique prints. Every time I tell myself that I'm done with the business bibs and maybe it's time to start looking at something different, I find another print that is just too perfect to pass up. I try to keep a mix of the trendy and the classic so that there is something for everyone. It's also been exciting and validating to see how the designs that I feel are my most inspired are the ones that sell the best. There have been times when I have ventured into something overly cutesy or not quite my style and I would use it anyway, thinking that it would be a big seller and instead it just sits there. It's taught me to trust my instincts when creating and design what I love. 

6.  Anything else you'd like the readers to know.   
I welcome your ideas and custom orders! Some of my favorite designs came out of conversations with customers who were looking for something very specific.
I also just want to encourage everyone to create and improve. Try something new. Take a basic skill to the next level and challenge yourself. We are all inherently creative. Whether you are creating a baby bib, a wall hanging, a healthy meal for your family, a safer country, a loving and respectful child, you are putting something good out there and making our world more beautiful!

Are you just dying over these adorable bibs yet?  Enter to win this super cute blue bib from A Desi Lu Production through the RaffleCopter host below. 


Good Luck, Everyone!

Saturday, May 4, 2013

Teacher Appreciation Gift - Golf Themed


Teacher Appreciation Week is May 6-10, 2013

I look forward to this week every year - not because I'm a teacher - but because my husband is.  You see, this week he gets flooded with cookies, candy and Starbucks gift cards... which always seem to make their way home to me.  Why?  Well, he likes sweets...but not that much... and frankly, he doesn't go to Starbucks {unless it is to get a Venti milk and a chocolate chip cookie}.  While I fully enjoy the fruits of his labor, it does make me sad that he doesn't get many gifts that are truly for him.  I have been compensating for this every year by buying him a gift for Teacher Appreciation Week that I know he'll love - like bow ties... lots and lots of bow ties.

Well, this year - I'm changing that.  This year - y'all are getting a Teacher Appreciation Week gift idea for those fabulous male teachers.  {At least, the ones that like to golf... I can only change the world one printable at a time.}

This gift is easy and inexpensive.  Just buy a mason jar, a bag of golf tees {or golf balls}, fill, print and tag!
I got 12 quart size mason jars at Walmart for $8 and a bag of golf tees is only about $3-4.

There are {SIX PRINTABLES} below - I upped the cheese-factor on a few of them, so pick whichever ones work for you.  They are jpeg files, so you can resize them at will.

**Note: I did not watermark these photos due to their style- however, they are protected by copyright and for personal use only.


Blogging tips