Showing posts with label Wreath. Show all posts

Thursday, January 22, 2015

Easy Monogram Christmas Wreath

Front Door Wreath

I bought a simple green wreath on sale at Michael's for $4.  I also bought the decorative sprigs for 50% off.  Total price for this project was roughly $10.

I created the "E" out of a prepped white wood letter, Sharpie paint pens, pencil and ruler.  I used a 2" ruler to create the diamonds and just filled in with the paint pens.  It's secured to the wreath with hot glue.

Simple, quick and easy.


Friday, November 9, 2012

Pinspiration Friday: Fall Wreaths


Have you created your Fall wreath yet?
Well what are you waiting for?

The wreath above is a creation by yours truly!
I purchased floral accents and a grapevine wreath from Hobby Lobby
and simply went to town with a hot glue gun.
No special trick, just filled it in!

Here are some other ideas to inspire you!


For more Fall inspiration, check out my 
Thanksgiving Pinterest Board
{because let's be honest, fall is all about Thanksgiving}


Tuesday, October 16, 2012

Dark Roses Halloween Wreath


Add a little dark and creepy to your Halloween decor
with this rose wreath.
Extra bonus - super quick and inexpensive!

Time Needed: 30 minutes

Materials: 
Fake Roses (Tip: Buy on sale!!!)
Wreath (Used: Natural Wreath)
Black Spray Paint
Scissors
Hot Glue Gun
Hanging Wire
Cardboard Box

Instructions: 

1.  Cut blossoms off main stem leaving about half an inch of stem.  Lay around wreath to ensure you have the proper number and distribution of flowers to cover the whole wreath.

2.  In a well-ventilated space outdoors, lay blossoms face-down on ground cover and lightly spray with black spray paint.  I wanted a little red to show through but spray to your desired color.

3.  Flip flowers over and spray black.  I used a cardboard box as my covered space, so I was able to make holes in the cardboard into which I stuck the blossom stems to stand them upright.  I also had to spray my flowers about three times to get the color I wanted.

4.  After allowing flowers to dry, use hot glue to attach flowers to wreath in desired pattern.
**TIP: Make sure you lay out the roses in the wreath first before gluing the buds in.  This will ensure an even and full wreath.

5.  Hang wreath and enjoy!


Sunday, August 5, 2012

College Pride!


In less than four weeks, the biggest event of the year will take place - the first kickoff of college football!  My beloved ASU Sun Devils will take the field and we will be rooting them on.  To get our home into the spirit, I created a few decorative accents.

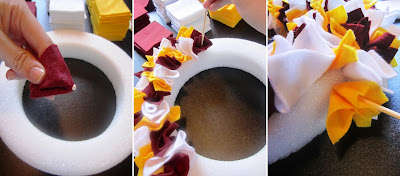
College Felt Wreath

Materials:
Floral Wreath Form
6 12"x9" Sheets of each color felt (18 sheets total)
Tacky Glue
Wood Skewer
Embellishments
Hot Glue

For detailed instructions making the felt wreath, please click here.
** Change: For this wreath I used 3"x3" cuts of felt


To Make College Logo:
1. Measure the clearance in the middle of your wreath after felt has been put in.  Mine was 5.5 inches.
2. Print logo out on cardstock - use Word/Publisher to ensure it's the proper size.
3. Cut out logo and trace onto foam poster board.
4. Carefully use X-Acto knife to cut out logo.  I did a clean cut through the top layer of the foam board and then used more of a sawing motion to cut through the second layer.  This kept the board from pinching and collapsing.
5.  Paint your college colors!

College Pride Display

Materials:
3 12"x9" Sheets of each color felt (9 sheets total)
2 3" Floral Sphere Forms
Tacky Glue
Wood Skewer
Cardboard Letters
Paint

To Make Poms:
Use the same technique to make felt wreath, but alternate direction of layers around floral spheres (see below).  Use 1"x4.5" cuts of felt.

** Tip: I bought my felt at Hobby Lobby.  They sell sheets of felt 4 for $1.

Are you ready for some football?!
We sure are!

GO DEVILS! 


Thursday, July 7, 2011

Fourth of July Wreath


Approximate Time: 2 hours

Materials:
12 inch white styrofoam floral wreath
6 sheets of White Felt
6 sheets of Red Felt
4 sheets of Blue Felt
White Felt Stars
Tacky Glue
Wood Skewer (the cooking kind)
Scissors
Ruler
Pencil
Ribbon (if you'd like to hang it by the ribbon... I didn't)


Instructions:

1. Cut all sheets of felt into 2.5 x 2.5 inch squares.  You will have some felt left over - KEEP IT!  You'll need it.  Just put it to the side for the time being.

2.  Take a blue felt square and wrap it around the flat tip of a wooden skewer.  Add a small drop of Tacky Glue to the tip.  This will help adhere the felt to the wreath. 


3.  Starting in the middle of the wreath, begin inserting felt squares.  Use gentle pressure.  For spacing purposes, I inserted felt a half an inch apart. 


4.  Do you have some gaps?  Cut your leftover felt scraps into squares and insert at your pleasure. 


5.  Using the same spacing method from Step 3, insert red and white felt squares.  My stripes were 2 squares wide to make 11 stripes.  If you would like a fuller look, do your stripes 3 squares wide to make 9 stripes.


6.  Fill in your entire wreath to your heart's content.  Using all of your squares and using scraps, you can pack the wreath to be quite full.


7.  Adhere stars to finish off your patriotic flare!

Hang and Enjoy!


OPTIONAL:

I used Mod Podge (Matte) to seal the back of my wreath to avoid shedding.  You can also adhere felt or fabric. 


If you would like a fuller but less packed look to your wreath, cut your felt squares into 3 x 3 inches.  This will give you a bit more wave.


Inspired by: http://ssbuffat.blogspot.com/2010_06_01_archive.html

 
Blogging tips