Wednesday, February 26, 2014

My Time as a Photographer -- Take Two!


When your two best friends ask you to take pictures of them for part of their wedding reception decor, you really can't say no.  Even though I prefaced it with, "I'm really not that good" and "Are you really sure you want my goofy butt to do it?", they still insisted that it would be perfect.  PERFECT!  Great - no pressure.

To prep, I reviewed my notes from the last time I played photographer {My Time as a Photographer} and did more research on outdoor photography.  I read blog upon blog about camera settings and proper lighting.  I even read some articles about directing people during a photo shoot.  I felt armed.

I was soooooo not prepared.

Here's the thing about taking pictures of your two best friends who are about to have the biggest event of their lives thus far........after 14 years of being together........... it's emotional.

A few times during the shoot, I had to hide behind my lens or fain getting something in my eye to hide the little tears.  I mean, come on!  I just love these two!  Look at them!
Ugh!  I'm getting emotional again!  Anyway!

They were actually very easy to photograph.  Even though I took about 560 pictures and only really liked 20 of them, I'm still really happy with the way these turned out.  They love each other so much that I didn't even have to try hard to capture it.
They were the perfect mix of romantic and silly with each other during the shoot.  I have more goofy photos than kissy-kissy ones, but that's pretty much the story of their relationship.  And on this morning, even the birds wanted in on the fairy tale.  Check on the picture of them walking away from me.... does anyone else see a heart?
******************

A really fun twist on their wedding was the addition of baseball elements.  The groom has played baseball his entire life and it is such a huge part of their story - of course they had to incorporate it!
We went to a local Little League baseball field for some really fun shots!  Aside from the bride's inability to keep dirt off her, everything went swimmingly.  They were infinitely more comfortable at the baseball field than they were at the park and these pictures ended up having a lot more life to them.
The bride purchased a custom bat from Pick Your Plum a few months prior to the wedding and created the heart shape with an assortment of used baseballs.  It turned out to be a perfect accent to the pictures!  They also brought along baseball gloves for a quick game of catch and of course they needed to be used in the photos!
I am actually very touched that they trusted me with these photos.  They have been two of my best friends since I was 14 years old and I am so grateful to have them in my life.  They are wonderful people who do wonderful things and I couldn't have been happier for them.

Again... no, I'm not a photographer... 
but it's fun pretending!


Monday, February 24, 2014

Cricut Canvas Tote Iron-On Tutorial


I am notorious for carting around a plethora of craft supplies.  I take them to friends' houses to work on projects.  I take them to work sporadically for special mission.  And occasionally, when wonderful people buy from my Etsy shop, I have to tote their shipments to the post office.  Amazingly enough - I don't have a bag to help me in my mission.  Well... didn't.  I DIDN'T have a bag.  Until now!

In this tutorial, I use my Cricut Expressions 2 to cut iron-on material and apply to a canvas tote.  Let's get started!

Materials
Canvas Tote
Iron-On Material
Cricut Expressions 2
Iron
Ironing Board
Cotton Cloth
Paper Cutter
X-Acto Knife
Ruler
Sewing Pins

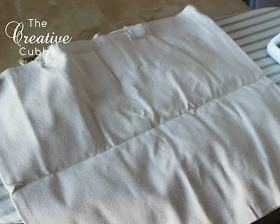
1.  Unroll your canvas tote, wash and iron out the wrinkles.  Set aside.
2.  Decide on the size and layout of your design.  My design is 12" x 4".  Cut your vinyl to size.
3.  Apply material to the Cricut cutting mat - liner side DOWN.  See below - the liner side is the shiny/plastic side.  Insert your mat into the machine.
4.  Create your design on your Cricut machine.

**REMEMBER!!!** For iron-ons, you will be cutting the MIRROR image of your design. 

Put the phrase into the line, spelled backwards and size to fit.
Looks pretty good but it's not the MIRROR IMAGE.  Select a letter and the Edit pencil.
In the Edit screen, flip the image horizontally (the second option) and hit Save (the disc). 
MUCH BETTER!
5.  Reference the Cricut cutting instructions for the settings appropriate for your machine.  On the Cricut Expressions 2, I just selected Vinyl Kiss Cut and changed my blade dial to 4.
6.  Select Cut and watch it goooo!
7.  Once the design is fully complete, eject from your machine and remove material from the mat.  Because you did a kiss cut, the liner should not be cut at all.

8.  Carefully remove the excess material around your design and any pieces that you won't to iron onto the tote.  This is called "weeding".  Cricut sells a lot of "weeding" tools.  I just use an X-Acto knife.  Set aside.
9.  Turn on the iron and put on the highest setting.
10.  Figure out the position of your design.  Use sewing pins to mark the corners and set aside your design.
11.  Lay your cotton cloth over the canvas tote and pre-heat the material.  This means - iron the material to warm it up - this helps adhere the iron-on to the canvas.  **NOTE : You still have NOT put your design on the tote.
12.  Now that your material is prepped, take off the cotton cloth, place your design, remove the sewing pins, and recover with the cloth material.  Phew!
13.  It's go time!  Using gentle pressure, press the iron onto your design to adhere.  Use a "lift and press" method, instead of a sweeping motion.  Leave iron on design for 10-15 seconds per location.  Flip canvas tote over and iron from the back side.  Flip again and repeat lift and press over entire design again.
14.  You're almost done!  Allow the design to cool 5-10 minutes.  Pull up a corner of the design to test if iron-on material is fully adhered.  IF THE DESIGN IS LIFTING, place cotton cloth back on top of design and re-iron, focusing only on the area that is lifting. 
15.  When design is fully ready, pull liner away from design at a 45* angle.  Move slowly and keep your eye out for lifting.  If you do have some, don't panic.  Place the liner back down, place the cotton cloth on top and iron the location (focusing only on the area that is lifting).  Allow to cool 5-10 minutes and try again.
Ta-Da!!!  All done!

I have already used this bag extensively!  I love that I always know where my craft stuff is when I travel with it and ... well, it's cute.  :)  I hope you are inspired to make your own!

Friday, February 21, 2014

Wednesday, February 19, 2014

Guest Post: Achieve Organization and Stay that Way!


With kids, work, and day to day activities, our lives can get absolutely chaotic. With so much going on it’s easy to see getting organized as a far off and distant dream. However, easy steps day by day can help you achieve an organized lifestyle that will last.


Determine Your Goals: The first step is to dream as large as you can. What would be your ultimate dream? Do you want a home that looks like a museum where everything has its place? Or is your goal to be able to cut down the clutter enough to be able to walk through the room? Whatever your goals, write them down.  


What’s realistic: Think about your schedule. What do you think is achievable? Understand that it is okay to ask for help. You don’t have to do everything yourself. Beside your goals, write down what you think would be achievable.


Cut the Clutter: The number one way to get and stay organized is to cut down on the amount of stuff that you have. There is no need to organize items that are rarely or never used. Consider donating, selling, or throwing these items away. You’ll feel amazing once you don’t have so much stuff to worry about.


Get Help: Today there are so many different forms of ways to get help getting organized. If looking help getting started, consider enlisting the help of a professional organizer. When this isn’t in your budget, consider getting the help of your children. Offer them a special prize for helping you clean or making it a game. Looking for little helpers day by day? Consider downloading an app that allows you to make to do lists like Remember the Milk. It allows you to make to do lists and even get reminders when something is due.


Start A Habit: Teach yourself and other members of your family to put things away immediately. This little trick will save you time and sanity. By following this tip you’ll  know where everything in your home is at all times.


Reward Yourself: Now that you’ve gotten organized and developed a habit to stay that way, it’s time for a reward. Whether it’s chocolate, a shopping trip, or a five minute break, do what makes you happy. With this positive reinforcement you’ll be more likely to want to get more organized in the future.


Remember, getting organized doesn’t happen all at once. It is a day by day trial. However, by following the tips above it can be a little easier process.

***********************************
Author: Stephanie Hanson of Monkey Bar Storage