Tuesday, May 28, 2013

Giveaway - CatchingFireflies.com


In honor of being in the blogging business for a full year {woot woot!}, I'm giving away a fabulous gift certificate to a fabulous site!

Have you ever been to CatchingFireflies.com?  No?  Then you're totally missing out!  They have seriously adorable and unique gifts ideas - from inspirational home decor to fun guy gifts {oh yes, gifts for guys!!!}  There's something for everyone - including you!  Just check out a small sampling of the products they offer:


Are you interested?  Are you in love yet?  Good!

How would you like to win a $43 Gift Certificate to their site to spend on whatever you would like?!

"$43?  Jen, that's odd.  Why $43?"
Because nothing says fun and quirky like an odd gift certificate to a totally unique online store, that's why.

How do you win?  Simply enter below!

Winners will be randomly selected and 
notified on Tuesday, June 4th of their awesome victory!


Wednesday, May 22, 2013

Glass Etching - 4 Lessons Learned


When my husband and I decided to build our own home, I know I wanted to capture an organic piece of the land before it became a house.  So we collected a bottle of dirt from the lot to save for... you know, memories.  When the idea came to me to etch the glass of the bottle, I didn't realize the small difficulties I would experience.  I mean, really, how hard could it be?!

Below are 4 pieces of wisdom about glass etching I feel everyone should know about this very easy project.

1.  If the item you plan to etch is a container, do not fill the container prior to etching.  
This seems pretty standard operating procedure but really.  While the idea of etching occurred to me after filling the bottle {I get a little slack, right?}, I should have prepared by emptying the bottle before "Go" time.  Why?  You need to clean your piece to remove any oils or dust that may be sitting on the surface.  Because our container was a cork top, it would have been very difficult to not have a water/moisture catastrophe.  Instead we had to empty the bottle, clean the inside and outside, and wait for the whole thing to dry.  Very time consuming - be prepared.

2.  The package directions are NOT descriptive enough.  Do your research.
The mere fact that you are reading this means that you are interested in glass etching and are already doing your research.  Good job!  It's very important to learn about the different types of stencils and best tools.  Why?  The packages for stencils tend to oversimplified the directions and therefore, you can actually apply them incorrectly.  Glass etching is a very easy project but you must know the basics to achieve the best results.  For instance, one-time use, or water soluble, stencils, must be placed, rubbed on to the glass using their "application tool" {aka a popsicle stick} and then the plastic cover will COME OFF {like applying a temporary tattoo}.  Do not layer or place all of your stencils prior to removing the plastic.  This will destroy your design and/or ruin your stencils. For the record, the "take the plastic off" part was not outlined on the package.

3.  Be patient! 
Why?  Rinsing off the etching cream prematurely will cause the etching to be faint and there's no way to fix this if you use disposable stencils.  If you are using the reusable stencils, you can fully dry your piece, do your best to realign your design and give it another go, but there are no guarantees.  Do it right the first time and be patient.

4.  Not all glass is created equal.
Even after doing the research, applying everything properly and being patient, you still may not get desired results.  Why?  Not all glass is optimized for glass etching.  Some glass products have anti-scratch or reinforcement coating that make it nearly impossible to etch.  So no, you are not a craft failure - you just didn't have the right materials.  I have found that the less expensive the glass container, the harder it is to etch - which is counter-intuitive.  Also, the thicker the glass, the harder it is to etch.  Do not automatically think "Oh, I'll just leave the cream on longer."  Prolonged contact may cause the cream to migrate on the underside of your stencil and skew your design.
Where is my design?  
In person, you can see it if you hold the bottle juuust right.

I have yet to revisit this project and experience success, but you bet your bottom dollar there will be a detailed tutorial when I do.

Best of luck to you in your etching!

Thursday, May 16, 2013

Happy Birthday - To Me!


Today I am celebrating the big 2-7!
I know, 27 isn't a big deal, but at least I have Monty at work to celebrate with me.
Doesn't he look cute in his party hat?

This birthday comes with a lot of changes.
I just started a new "real" person job this week
and the transition has been a little... tiring.  
{Sorry for the lack of creative inspiration.}
My hope is to be back on the horse by this weekend
and resume sharing the creative love.

Thanks for sticking with me and making my life truly magical.

Cheers to another great year!

Btw! 
Did you know Google will wish you a "Happy Birthday" on your big day?
Be sure to check it out when yours rolls around.


Saturday, May 4, 2013

Teacher Appreciation Gift - Golf Themed


Teacher Appreciation Week is May 6-10, 2013

I look forward to this week every year - not because I'm a teacher - but because my husband is.  You see, this week he gets flooded with cookies, candy and Starbucks gift cards... which always seem to make their way home to me.  Why?  Well, he likes sweets...but not that much... and frankly, he doesn't go to Starbucks {unless it is to get a Venti milk and a chocolate chip cookie}.  While I fully enjoy the fruits of his labor, it does make me sad that he doesn't get many gifts that are truly for him.  I have been compensating for this every year by buying him a gift for Teacher Appreciation Week that I know he'll love - like bow ties... lots and lots of bow ties.

Well, this year - I'm changing that.  This year - y'all are getting a Teacher Appreciation Week gift idea for those fabulous male teachers.  {At least, the ones that like to golf... I can only change the world one printable at a time.}

This gift is easy and inexpensive.  Just buy a mason jar, a bag of golf tees {or golf balls}, fill, print and tag!
I got 12 quart size mason jars at Walmart for $8 and a bag of golf tees is only about $3-4.

There are {SIX PRINTABLES} below - I upped the cheese-factor on a few of them, so pick whichever ones work for you.  They are jpeg files, so you can resize them at will.

**Note: I did not watermark these photos due to their style- however, they are protected by copyright and for personal use only.


Friday, May 3, 2013

Pinspiraton Friday: Teacher Appreciation Gifts

Teacher's Appreciation Week is May 6-10, 2013

Show your appreciation with these crafty, creative and clever gift ideas.

S'more Packs

Mason Jar Gift Sets

Soda Bottle Gift Set

Summer Gift Set

Herb Gift Set

Find more fabulous gift set ideas

Happy Teacher Appreciation Week!
Thank you, teachers, for all you do!


Wednesday, May 1, 2013

Safety Pin Bracelet - Refashioned


I've seen a very vibrant safety pin bracelet floating around on Pinterest and while this particular bracelet isn't my style, I thought, "Hey Jen, you have a container FULL of random beads.  Surely you can find something to use."  And boy, did I!

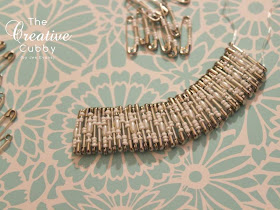
These are really easy bracelets to make and they certainly don't look like safety pins when you are done.  

Materials
Safety Pins {Used: roughly 75 1/8" safety pins.  I have very thin wrists.  I suggest buying about 100}
Stretchy Jewelry Cord
Glass Beads
Super Glue

Instructions
1.  String beads onto pins.  I {of course} wanted to create a pattern, so I worked on five different pin patterns.  Do what moves you.

2.  Once all done, establish your pattern.

3.  Cut a 2" piece of cord.

4.  Start stringing!  Create an end by feeding the cord through both holes in one safety pin - this will be your "end".  Don't worry, you won't see it when you're done.
 String on pins going head to tail.  This allows the pins to puzzle piece together rather than having the heads all on one side - making it really uneven.
 Keep going until it's long enough to fit around your wrist.

5.  Tie off your end.  To finish, just feed the cord through the holes of the opposing side holes and tie ends in a knot.  This will create a fully connected bracelet.
 Add a dab of super glue on your knot for good measure.
 And sport your fabulous jewels!